Sony has finally issued a fix for the 4.45 update which ‘bricked’ a number of PlayStation 3 consoles last week, leaving gamers without access to their consoles unless they were able to swap in a new hard drive.
It took the company several days to give an update on the situation, with Sony tweeting at the end of last week that an update would arrive on the 27th. That day has arrived, and version 4.46 is now ready to roll. Here’s how to install it if you have a bricked PS3.
Step 1 – Downloading the update
- You’ll need a PC or Mac of some description with a connection to the internet and a USB stick of 256MB or more of storage space free.
- Download the 4.46 update to your PC from Sony by following this link
- Use ‘Computer’ on Windows or ‘Finder’ on Mac to access your USB stick. Create a new folder and name it ‘PS3’
- Within that folder create another folder and name it ‘UPDATE’
- Once downloaded, copy and paste the update file into this folder
- Rename the file itself to ‘PS3UPDAT.PUP’
- Unplug your USB stick
Step 2 – Put your PS3 into Safe Mode
- Firstly, ensure your PS3 is turned off and the power light is red
- Hold the power button – you will hear 1 beep. Keep holding the power button until a second beep is heard, followed by a third beep 5 seconds later. At this point the console will turn back off again and the power light will become red once more
- Release the power button
- Press and hold the power button. You will hear a beep followed by a second 5 seconds later, followed by a quick double beep – release the power button now
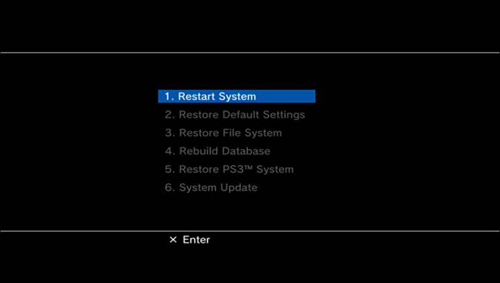
- This should have successfully put your PS3 into Safe Mode, which is signified by a message on screen asking you to connect the controller by USB and press the PS button in the centre.
Step 3 – Update software to 4.46
- Connect your USB stick to the PS3 console
- In Safe Mode, select Option 6 which is System Update
- Press Start and Select together on the controller for 2 seconds
- The PS3 will now reboot itself and detect the update file stored on the stick. If it does not detect the file, you need to connect it into your PC again and ensure the files and folders are named correctly
- Scroll to the end of the User Agreement and press X to accept
- Press X to confirm you wish to install the update
- Wait patiently whilst the update installs and your console reboots!
That’s it! If you encounter any problems along the way, try formatting your USB stick to clear it out and ensure the folders are set up and labelled correctly and the update file itself is renamed ‘PS3UPDAT.PUP’. If that fails we’d suggest deleting the file from the stick and re-downloading it!
If that still doesn’t work, get in touch with Sony for further help.


