Acer’s fantastic Iconia Tab A500 has recently received a software update to Android Honeycomb 3.1, giving it a performance boost and some new features including USB 2.0 Device Host.
Unfortunately though, we’ve received several calls from customers who have updated their tablet to 3.1 and since had Wi-Fi connectivity problems. The most common problem we have experienced is a constant ‘connected’ followed by ‘disabled’ after connecting to a Wi-Fi network after performing the update. A very frustrating problem and one that we’ve been working hard to resolve!
The Gadget Helpline has come up with a workaround for this issue, thanks to a patch released by Acer to fix the problem. If you follow our step by step guide below, you should be on your way to a reliable Wi-Fi connection again.
Firstly ensure you have a PC with internet connectivity, the USB cable and a MicroSD card of at least 2GB in size (2GB is plenty). Once you’ve got all of that ready, follow us as we guide you through the fix!
- On your PC, head over to the Acer Support page. You can get there by clicking here.
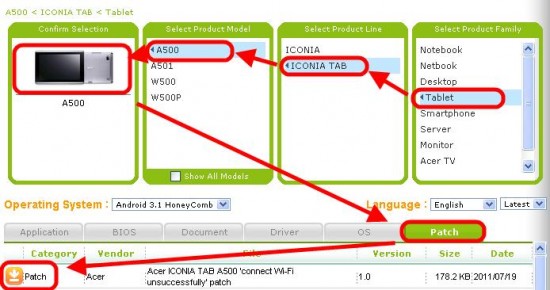
- In the Select Your Product section, follow the steps in the screenshot below to choose the Iconia Tab A500.

- Click to the Patch tab and then the Orange icon to download the Acer ICONIA TAB A500 ‘connect Wi-Fi unsuccessfully’ patch.
- Right Click on the downloaded folder and extract items. You should be left with a PDF file and an update.zip file.
- Format your microSD card using a FAT or FAT32 format.
- Connect your Iconia Tab A500 to your PC using the USB cable.
- Copy Update.zip to the empty microSD card.
- Ensure the tablet’s battery is fully charged.
- Power off your A500 tablet.
- Insert the microSD card into the A500 tablet.
- Press and hold the “Volume Down” key (closest to the Power key) then press and hold the “Power” key.
- Once the “Power” key white LED turns on, release “Power” key but still hold “Volume Down” key.
- The Acer screen will appear and the tablet will vibrate. Do not release “Volume Down” key until an “Erasing cache before SD update…” message appears in the upper left corner of the screen.
- The patch is installed within a few seconds.
- The A500 will automatically reboot when it is complete.
- To complete the patch installation process, disable and then re-enable WiFi.
That’s it! Once you’ve followed these steps you shouldn’t have any troubles with connecting to Wi-Fi networks.
If you have any questions regarding the fix or have any troubles, feel free to drop us a comment and we’ll do our best!