
As we reported last night, Facebook announced a whole new layout of the Profile Page, called ‘Timeline’. At present, only Developers can use Timeline on their Facebook pages, but there’s a way that you can, too.
The Gadget Helpline has created this guide to help you change your Facebook Profile Page to the new Timeline layout. Follow it closely and you’ll be playing around with the new ‘covers’ feature and adding events to your timeline in no time.
Before doing anything, make sure you have a mobile phone number saved in the contact details for your page. This just verifies that you are the owner of the page.
Firstlyyou’ll need to click in the search box at the top of the Facebook Homepage and type ‘developer’. Click the first option and then click Allow on the screen you see below.

You’ll now be taken into the Developer App. If you’re not, you should see an icon for it on the left side of your screen, just click it.
Click to create a New App, give it a name and a namespace. The namespace cannot contain any capital letters, symbols or spaces. It doesn’t really matter what you call it, because nobody is really going to see it. Click the agree to terms and conditions box, and then fill out the captcha screen to verify you’re a real human and voila, your app is made.

Now you need to click on ‘Open Graph’, which is on the left side, as circled in the image below.

You’ll now need to define an action for your app. It’s as simple as writing an action in the first box, like ‘eat’, and an object in the second box, such as ‘sandwich. Once that’s done, click Get Started.

You’ll now see a screen full of settings. Don’t worry; all you need to do is change the text in the ‘Past Tense’ box. It doesn’t matter what you write, change it to whatever you like. Then you need to scroll down to the bottom and click ‘Save Changes and Next’.
There are three pages of settings for your app, so again, on the next page you’ll need to scroll to the bottom and click ‘Save Changes and Next’. Once you get to the third page, which says ‘Timeline Aggregations’ at the top, click ‘Save and Finish’ at the bottom.
Once you’ve done this, wait 2-3 minutes and then go back to your Facebook Homepage. You can do this just by typing www.facebook.com back into your browser’s address bar. Once you’re back to normal, you should see an invite appear at the top of the page, asking you to use Timeline. If you see the same message as below, click ‘Get it Now’ to start getting your Timeline on.

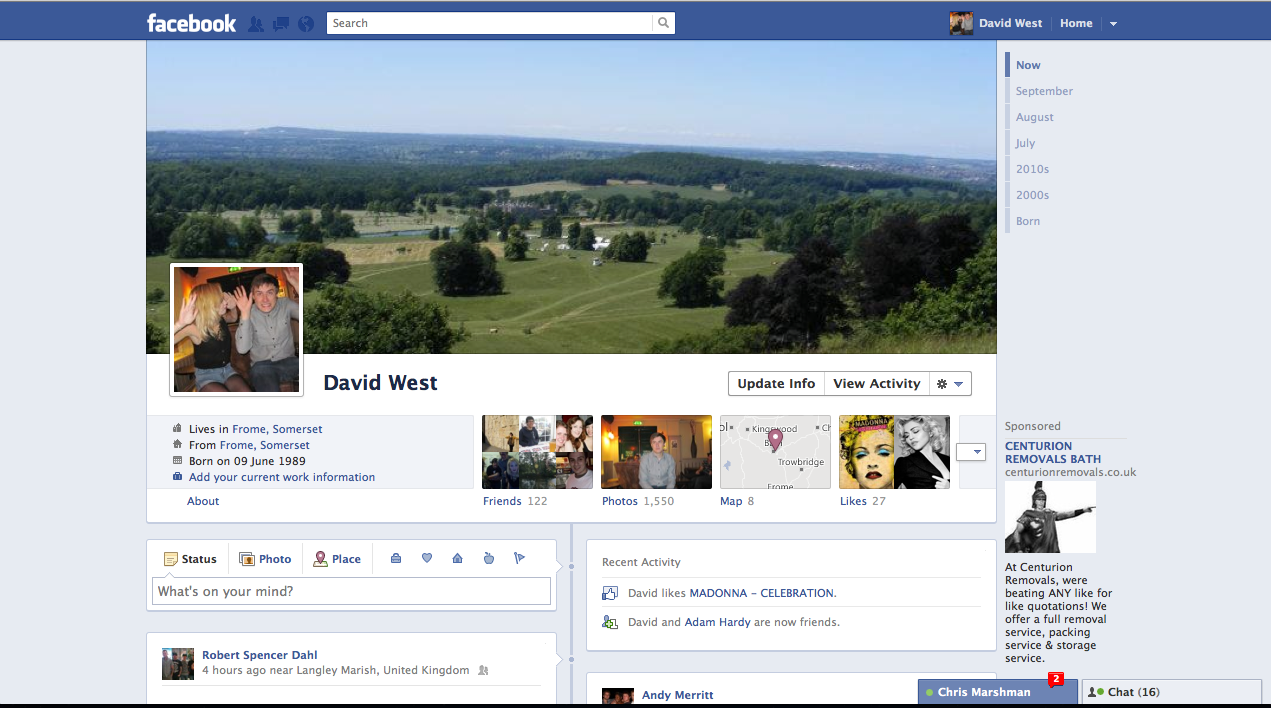
From here you’ll be taken to your new look Timeline profile page, where you can see everything you’ve ever done on the Social Network. Ever. Make sure you have a play around with the ‘Covers’ feature too, it’s pretty fun!
A couple of points before you get started. This is still a feature that is being tested – it won’t be perfect and you may find some glitches. They will be sorted out before Timeline is released to the general public. Other people will not being able to see your Timeline style page unless they too have enabled the feature.
Once you’ve added your cover and checked out your Timeline, click ‘Publish Now’ at the top of the page to finish it all off.
Let us know how you get on with our guide. If you’re struggling with any parts of it please let us know by using the comments below. If you get it to work, let us know what you think.